
From Exposure to the Printed Reproduction
Better results based on awareness of the problems and up-to-date techniques
By Gerhard Muhlebach, photolithographer (Bergdietikon, Switzerland), and Hans-Carl Koch, M.Sc. mech. eng. ETH (SINAR AG Schaffhausen)

You have surely had clients disappointed with printed leaflets or brochures for which you have taken pictures. Usually, you get much of the blame, too. Yet, with today’s know-how this should not happen. You should know what can go wrong at the start, when you take the pictures. You ought to know also how a photograph is related to a printed reproduction. For a photographic print and printed paper are two quite different media.
Good results in print depend on careful planning when you shoot the pictures to be reproduced. You must know what you want in print and the factors involved. Photographers tend to forget that print processes differ in characteristics, paper, screen rulings, ink weight etc. You must allow for the fixed conditions specific to the process – hence the original must suit the medium in which it is to be printed. We shall deal here with the main ways in which printing affects image quality and with how to achieve the best results.
The process sequence
Economics and technicalities of printed reproduction – from the first approach to the end product – closely link the skills involved in it. The job of the professional photographer is to produce a best possible record of the original subject. That largely determines the reproduction quality – for the reproduction can be no better than the original. The process operator has to convert photographic copy to printed images – allowing for printing criteria as much as for clients’ preferences. Again the printing run can be no better than the reproduction quality preceding it. The process sequence involves compromises of tone and colour gradation all the way from the original to the printed image.
Photographer, client and process operator often have different ideas of what the original to be reproduced should be like. What counts for the photographer is the creative and pictorial impact. The client is concerned with suitability for his purpose and message. The graphic arts technician looks at process characteristics. These different criteria have to be brought to a common denominator. Failure to appreciate these problems will at the end leave at least one of the parties involved disappointed. So note the conditions and limitations from the outset.

For the ultimate image
Technical scope and limitations
Current process equipment is highly sophisticated. To match the printing medium, modern scanners can extensively control coulour rendering, highlight and shadow gradation and density range of an original. But the most advanced techniques cannot add to an image what was lacking in the
photographic original. There is no way of remed in that originals
shortcomings.
The main technicalities involved concern:
Detail resolution and halftone screen ruling
Current printing processes break up an original image ito halft?ne dots. This affects detail resolution.
Printing on poor paper, for instance newsprint, needs a very coarse screen. This loses fine detail – you have to allow for that when taking the picture.
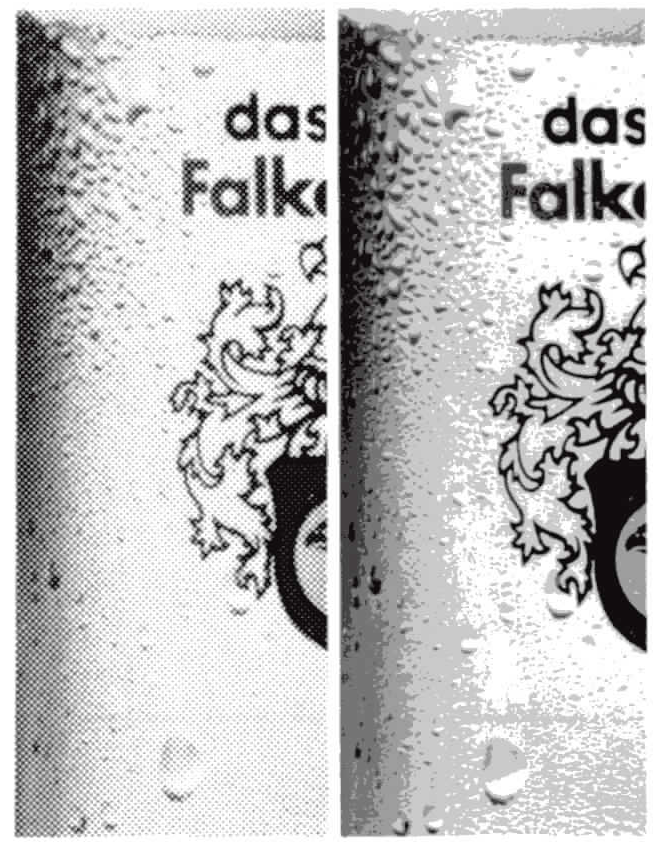
a) 25 dots b) 70 dots
Image contrast and contrast compression
The density range ( contrast) of a transparency is usually greater than can be reproduced in print. When you produce a colour transparency, this shows a contrast greater by a factor y of about 1.7 than the brightness range measured in the camera’s image plane. Hence a print of a colour transparency invariably involves a compromise. The contrast range of blackand-white originals – and generally of negative materials – is smaller and therefore easier to handle. Hence the printed result is necessarily inferior to the original transparency in brilliance and colour saturation. That’s when the client starts complaining of weak printing or washed-out colours. Process reproduction therefore involves compromises to adapt the contrast of a photographic original to the tone range reproducible in print. Despite numerous technical aids, compression curves for such adaption are still established by rule of thumb. Even with a matching tone range in the image a snow scene, a landscape with thundery sky and a fashion shot need different reproduction curves to make the printed result look satisfactory. The greater the tone range of the original, the more difficult the compromise becomes. The photographer can help by correct technique – knowing why and how to keep the tone range of a scene under control, and how to select a suitable compression curve.
a) Original transparency 2.8
b) C-Print 2.2
c) Offset print 1.7
For the ultimate image


For the ultimate image
Photographic requirements and recommendations
Can practical picture taking allow for such technicalities? Analysis of potentialities and limitations of related techniques has shown that many of the requirements can indeed be met – though occasionally with compromises. But as long as you know how the pictures are to be used already when they are commissioned, you can plan to make them ideal for their purpose. So the assignment should define:
- the point of the pictorial message (including layout instructions) and
- technical process conditions (paper, screen ruling, general quality requirements).
By matching your approach and technique to these points you make your real contribution to the whole job – from exposure to the final printing. Equally, however brilliant and creative your picture may be, if it won’t reproduce well, your client won’t be happy with it – nor with you as a photographer.
Detail resolution and sharpness
Where the image needs sharpness, the picture must be absolutely sharp. So look after adequate large detail (resolution) for the intended reproduction.
In particular:
- Match the size of detail and expanses of tone to the screen and paper on which the picture will be printed.
- A transparency will never be sharper than you focus it on the ground glass screen. So accurate focusing is vital. (Select a plane of maximum sharpness by two-point focusing and by the Scheimpflug rule. Stop down only just far enough for the depth of field you need. Use good viewing aids to judge the screen image exactly – you cannot afford to sacrifice overall definition.)
Correct colour rendering
Colour pictures should faithfully render the original colours, without lighting casts and without film processing faults.
In particular:
- Note that the colour of the light greatly affects the subject rendering. Thanks to adaptation, our eyes tend to ignore unusual colour effects in familiar objects. So use tungsten or daylight type film to match the subject lighting. Excessive blue skylight affects all colours. Thus blue sky degrades the colour of brown skin – which gets further emphasised in the reproduction. Such cases need appropriate filtering or fill-in flash.
- To avoid irremediable colour shifts, allow for reciprocity failure with long exposure times and use the conversion filters recommended by the film manufacturer. The most elegant way of doing this is to use spot readings in the film plane (which automatically allow for conversion filters) and the SINAR Digital shutter (for precise exposure timing) with a module that automatically compensates for reciprocity failure characteristics of different films. Where faithful colour is vital, you need precise technical aids with long exposure times.
Undamaged photographic originals
The photographic original must be free from mechanical damage such as kinks, scratches, stains etc.
In particular:
- Take great care in handling photographs. Flaws show up less in a large-size transparency than in a medium-format or 35 mm one. Preferably mark detailed reproduction instructions clearly on a transparent overlay to avoid damaging the transparency itself.
Controlled brightness range
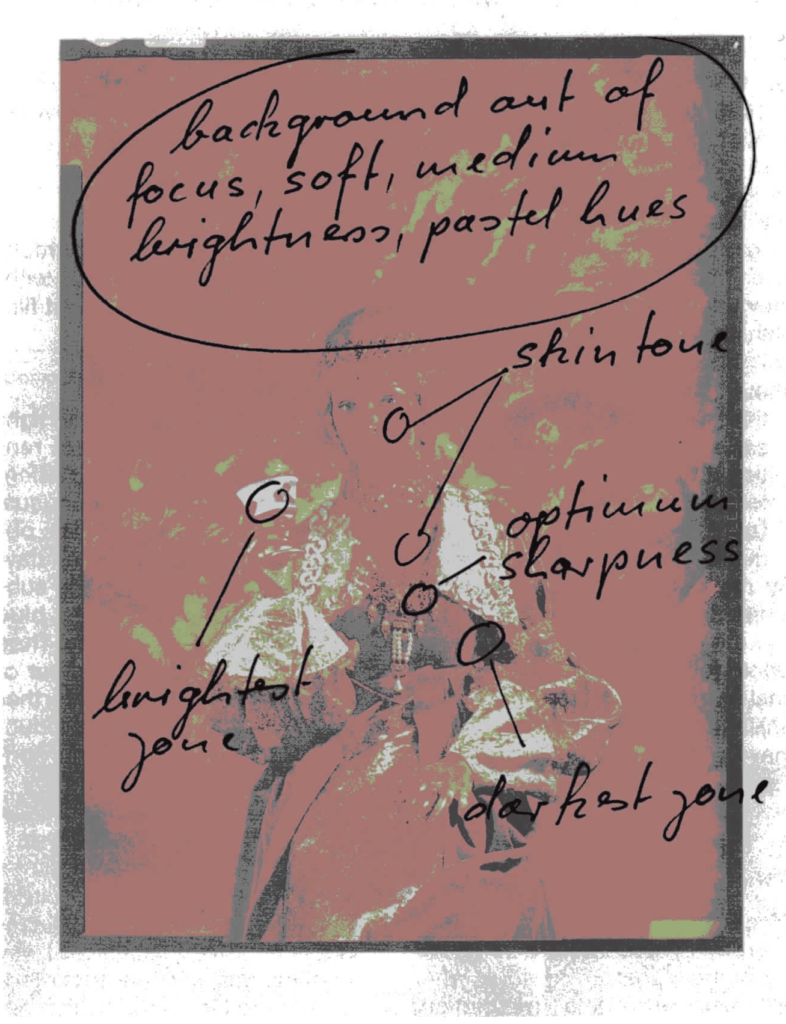
The photographic original should show good highlight and shadow detail. The density range between the brightest highlight (short of catchlights) and the darkest shadow detail should not exceed 2.55. In a transparency (of gamma 1.7) this is a maximum brightness range of 5 EV when measured in the camera’s image plane (contrast 1: 32 or density range 1.5). The exposure must be correct within ± 1/3 EV, otherwise you cannot rely on adequate highlight and shadow detail. Easier for subsequent reproduction is a brightness range in the image plane of not more than 4 EV ( 1 : 16 or density range 1.2) which yields a density difference of 2.05 between brightest and darkest tones in the colour transparency. For shooting this also has the advantage of greater exposure latitude.
In particular:
- Note the values established during shooting and mark them on a transparent overlay placed over the finished transparency.(Mark the brightest highlight, deepest shadow, midtone and data of important colour areas, points to be emphasised, mood etc.)
For the ultimate image
What you should pass to the process department is the transparency with these data. Then there is no room for misunderstandings. If the brightness range as measured in an image plane does not exceed 4, or at the most 5 EV and the data are marked as recommended, you can be sure of similar optimum reproduction in print. Depending on the subject and exposure conditions reduce the brightness range by one or more of the following measures:
- Adjust the lighting. (Filling in shadows is easier than reducing the lighting level of brightest subject areas.)
- Change the viewpoint. (Different viewpoints may involve different levels of light reflected from the subject.)
- Rearrange objects in the scene. (This could hide deep shadows or eliminate catchlights and flare.)
- Surface treatment of selected objects. (Painting in a different colour, use of matt sprays and other handiwork on the subject.)
- Use polarising filters to cut out reflections.
- Use graduated filters or colour filters to hold back certain subject tones.
- Add fill-in lighting with white reflectors around the subject, or deliberately generate stray light within the camera body with white paper inserted in the bellows.
Any one of these measures may fail or even make matters worse if you do not carefully measure the effect by spot exposure readings in the image plane.
(Photograph by P. Karasek, Prague/CSSR)
Correct exposure metering
All meter readings should be spot readings in the film plane with all light excluded from the rear of the screen. That is the only way of precisely allowing for camera extension, aperture tolerances, lens transmission, stray light in the camera, filter factors etc. The image plane of a view camera is big enough to permit full selective location and readings of a measuring probe. Suitable equipment is available from SINAR and can be used in manual mode with all view cameras. The automatic DIGITAL shutter system with the SINARSIX digital and module can equip all SINAR view cameras for up-todate automatic processing of meter readings and exact exposure settings. Important is also that the metering system operates equally for continuous light, flash and even mixed lighting.
For the ultimate image
Summing up
Over the years an experienced professional usually acquires some knowledge of the reproduction sequence from exposure to the printed result. Accurate meter readings and specification of the original may even seem an unnecessary bother. But such extensive experience is only of limited use with unusual assignments. The most experienced human eye still cannot reliably estimate subject brightness range -the eye’s adaptation compensates brightness differences. On the other hand, modern metering techniques combined with microelectronics get you there much faster and more precisely – with any lighting setup and subject – for best possible photography.
Of course you may have to compromise even if you follow the ways suggested here for solving problems. But such compromises will be more effective if you know what is involved.
Once you realise that the tone range of the printed page is far smaller than of any colour transparency, you can make your dramatic point in other ways and still preserve good reproduction. For instance you can rely on pictorial contrast – light against dark, brilliant against pastel hues, rounded and square shapes, large and small objects, calm and live moods or coarse against smooth texture.
It is rarely enough to admire the beauty of a picture. You have to ask yourself whether the original is indeed suitable for a given printing medium. If the latter cannot satisfactorily reproduce the picture, it is pointless to try and see whether the result is usable. Creative photography is important – but so is precise measurement to keep tone values under the control needed for correct photomechanical reproduction. Only then can the photographer’s effort get across in print. That can enhance photography – at a time when technology tends to swamp other crafts. It is also the best reason for the photographer to become thoroughly familiar with what he can achieve.
Further information:
SINAR Information No. 13:
Better image setting … leads to better pictures
SINAR Information No. 16:
Is the view camera obsolete?
SINAR Information No.20:
Facing the future
SINAR Information No. 23:
Selecting the right reading point for spot readings
SINAR leaflets: Exposure meters
Literature available in German Language only:
Fachhefte (Conzett+Huber AG, Zurich) 2/75, Hans Hugi , Was man wissen sollte, um eine reprogerechte Farbaufnahme herzustellen.
Bundesverband Druck E. V., Wiesbaden 1977, Beschaffenheitskriterien und Anforderungen an Reproduktionsvorlagen. Fachhefte 5/78, Gerhard Muhlebach, Das Sofortblld als Reproduktionsvorlage. Fachhefte 5/79, Erich Fischer, Farbvorlagen im Vergleich.