
Selecting the right reading point for spot readings

by Carl Koch
Addressed to experts, this article assumes familiarity with the principles of full-area reflected-light metering (meter pointing at subject) and of incident-light readings (meter pointing from subject at light source). Familiar should also be the fact that spot readings yield more exact results, especially in the film plane (see page 4). However, one problem with spot readings, especially in the beginning, is the selection of the correct reading point and evaluation of the readings for optimum exposures. Spot readings have a similar purpose to close-up readings of a subject with a hand-held exposure meter. Both types of measurement involve reading one or more subject brightness values and using these readings to establish a mean exposure. A handheld meter used with a spot attachment does the same but measures subject luminances even more exactly for subsequent calculation of a mean exposure.
This way of metering becomes still more accurate with spot readings of the image in the film plane of a view camera. For this allows automatically for exposure factors, possible aperture tolerances, flare, filter factors, vignetting factors, lens transmission efficiency, etc. And as such precise readings are always taken at the camera, operation is simpler still – for instance you are then unlikely to cast shadows on the subject while taking a reading.
In all such cases of reading specific luminances the question is what exactly to read. This can be learned and with spot readings exposure measurement becomes very systematic rather than more or less empirical with various sources of error.
We shall deal here in detail with spot readings. The explanations and illustrations are in part based on the ‘Professional exposure technique’ chapter of the handbook on the SINAR System ‘The large format’ (1982 edition).
Basically we have to deal with three types of reading:
- single-point readings
- multipoint readings
- contrast readings
For professional purposes the single-point and multipoint readings described below are only suitable for subjects of limited to medium contrast. See page 4 (fact no. 2).
Single-point readings
Single-point readings may be used in three ways:
Single midpoint reading on a grey card (Fig. 1 and 2)
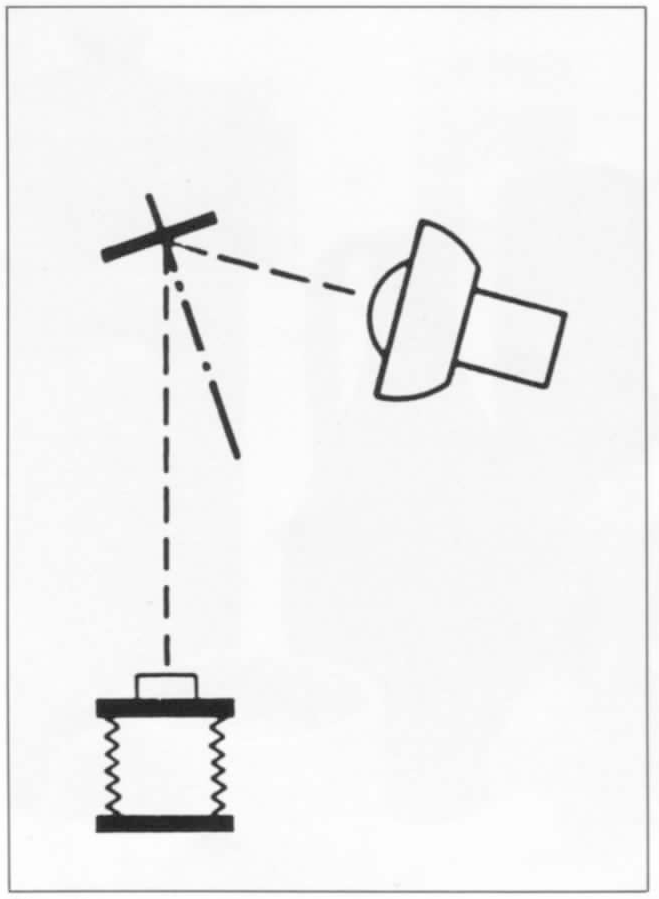
For the ultimate image
In the subject position place a neutral grey card of 0.7 nominal reflection density. Precisely read this area with the meter. That yields an exposure at that point to give the same image density (0.7) in a correctly processed print.
Every darker and every lighter tone in the original is rendered correspondingly darker or lighter respectively in the print. This is thus the simplest spot reading method. Note however the following points:
- Locate the grey card as closely as possible to the subject.
- Avoid glare reflections from the grey card towards the camera.
- For flat objects locate the grey card parallel to the subject (preferably laid on top).
- With solid objects and directional lighting locate the grey card at right angles to the bisector between the lens axis and the direction of the main lighting. Incline the card slightly forward to avoid glare reflections towards the camera
- For diffused lighting, backlighting and close-ups locate the card at right angles to the camera axis.
- In low light read from the white side of the grey card (90 O/o reflectivity). In this case open the aperture by 21/3 steps more than displayed on the meter or allow for this by setting the meter to a little under one-quarter the normal ASA film speed (7 DIN steps lower).
- With subjects of predominantly light tones reduce the exposure reading by 2/3 lens stop.
- With subjects of predominantly dark tones increase the exposure reading by 2/3 lens stop.
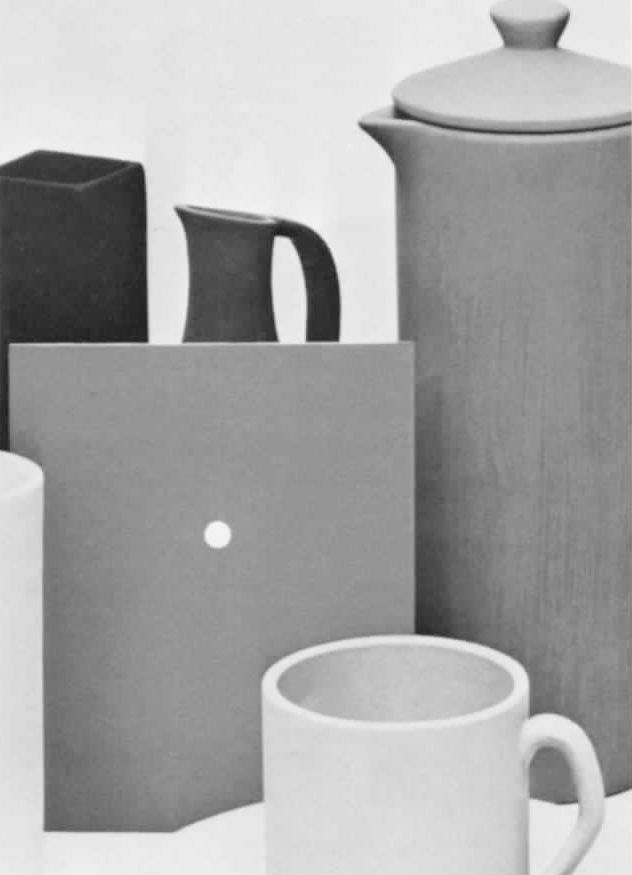
Single-point readings of a midtone in the subject (Fig. 3)
With distant views it is not always practical to place a grey card in the subject field. In that case select a midtone brightness in the subject itself and read that. When searching for a midtone, look through halfclosed eyes – that gives a better impression of actual tone values. Another way is to look through a deep neutral density filter, as often used by motion picture cameramen.
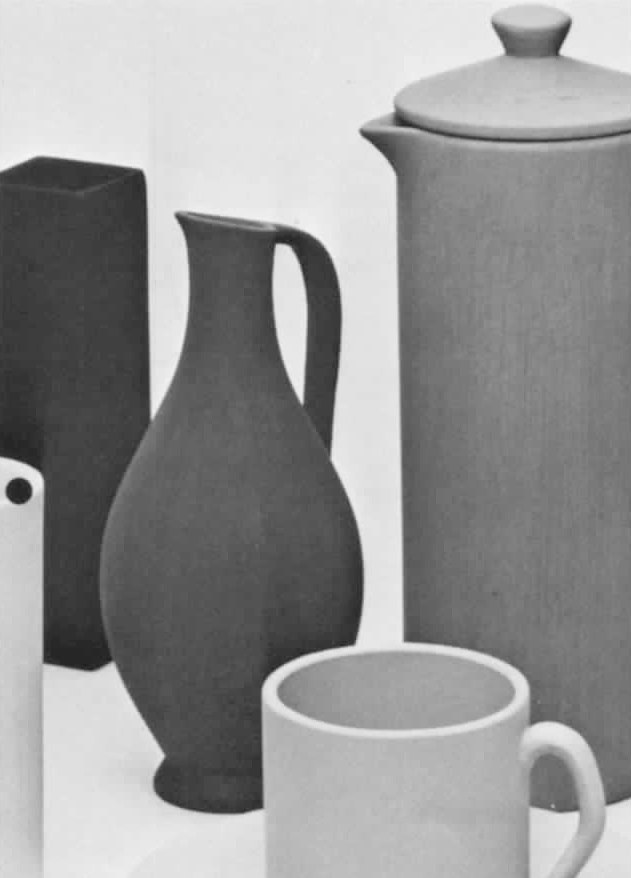
Single-point readings on a brightest Image point (Fig. 4)
If the subject has no suitable midtone (for instance snow, distant views, line originals on white background) or if the light is exceptionally weak, read a brightest image point that should still show detail (but not a catchlight). Then reduce the setting by 21/3 EV steps or set the ASA film speed to one step below one-quarter the original speed (or reduce the DIN value by 7).
A single-point reading on a brightest image spot can also check an uncertain midpoint reading.
As a single-point reading generally only covers a single luminance value, it is of course subject to tolerances and may often need individual correction. For that reason a multi-point reading is often preferable – and not just with difficult subjects, either.
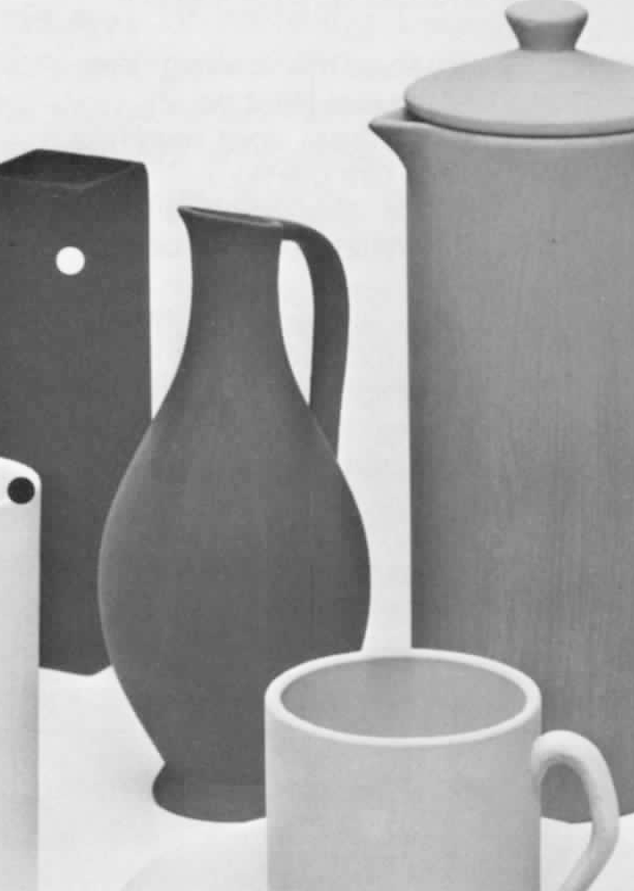
Multipoint spot readings
For multipoint spot readings the following procedure is suggested:
For greater accuracy read several image points that can count as midtones (Fig. 5) and use a mean of the readings for the exposure.
Such multipoint readings at first sight appear more elaborate than a singlepoint reading. But the electronic control of the SINARSIX-digital exposure meter with continuously calculated, displayed and set exposures makes this method more reliable and still sufficiently fast and simple.


For the ultimate image
Two-point brightness range (contrast) spot readings
As indicated on page 4 (fact no. 2), the contrast reading described below is suitable wherever the subject contrast (including lighting contrast) appears to reach the limiting exposure range of the film used. (That happens fairly soon with direct positive processes.) But as it is easy to make mistakes here, contrast spot readings should be the preferred method. In principle and application such readings are also simple, reliable and very informative. Proceed as follows: If a subject has no obvious midtones but both bright and dark areas, you can establish a precise exposure value also from successive readings of brightest and darkest points (Fig. 6) that should still show detail.
For such a measurement note the exposure values indicated at each reading and use a mean of these values for the exposure. The electronic SINARSIX-digital meter computes from these individual readings a mean value and automatically sets it on the SINAR DIGITAL-shutter.
Two-point readings at the same time provide brightness range or luminance ratios (contrast measurement). This brightness range is also indicated by the SINARSIX-digital meter.
A practical hint: Many photographers aim for brilliant (i. e. high-contrast) transparencies. That impresses the customer but this brightness range has to be compressed for reproduction in print. Such reproductions then look disappointing. You get better results in print by controlling the brightness range of the transparency from the outset.
Arriving at a correct exposure is however not the end of the line for spot readings. This technique can also deliberately control tone values in the print. More about that later.

For the ultimate image
Problems of Accurate Exposure
Even with ideal metering methods every professional now and again comes across mysterious failures. So it is worth looking more closely at their causes.
Fact no. 1
Equipment, materials, reading methods and also processing are subject to tolerances. It is illuminating to list all these critical sources of error.
| 1. | The material: | Film speed |
| 2. 3. | Meter reading | Exposure meter variations Meter technique (including reciprocity characteristics) |
| 4. 5. 6. | The camera: | Lens diaphragm tolerance Exposure time tolerance (precision of shutters used) Bellows extension, filters, flare etc. |
| 7. | Processing: | Development time and conditions |
| 8. | Illumination: | Illumination variance, flash guide number variance |
If we assume that each of these eight items is subject tea ± 1/6 EV error, that is quite a tight tolerance. However, by unlucky chance most or all of these eight tolerances could deviate in the same + (or -) direction, yielding an overall error of a whole EV step. So this problem needs specific counteraction.
A closer analysis of the tolerances that the photographer can influence (items 2, 3, 4 and 6) shows that spot readings in the film plane are vital. This metering method eliminates two of the eight sources of error (lens diaphragm tolerance and exposure factors) and a further two (exposure meter and metering technique) are reduced to a minimum.
Fact no. 2
Photographic subjects often have a greater brightness range than the film material can record. (Often the case with direct positive processes.) If the subject brightness range at the time of exposure exceeds the exposure range of the film material, you have virtually programmed for failure, even if the technical tolerances are zero and the exposure measurements exact.
The table above illustrates these fundamental limiting ranges:
| EV difference | Contrast (Brightness or luminance range in film plane) | Density range of film(assuming gamma = 1.0)* | Reproduction limits for various materials in terms of EV difference or contrast measured in the film plane (gamma = 1 .0) * |
|---|---|---|---|
| 0 | 1:1 | 0 | |
| 1 | 1:2 | 0.3 | |
| 2 | 1:4 | 0.6 | |
| 3 4 | 1:8 1:16 | 0.9 1.2 | Printing on low-quality paper (newsprint) |
| 5** | 1:32** | 1.5** | Colour slides, colour prints, printing on art paper |
| 6 | 1:64 | 1.8 | |
| 7 | 1:125 | 2.1 | Colour negative film (approx. 1: 150) |
| 8 | 1:250 | 2.4 | Black and white film (approx. 1 :200) |
| 9 | 1:500 | 2.7 | |
| 10 | 1:1000 | 3.0 |
* The density range indicated in the table Is that of a film Image processed to a gamma of 1.0. However negative materials are usualty developed to gamma 0.65 and colour transparencies normally have a gamma of around 1.7. The density range actually measured on the processed film therefore differs from these tabulated values. To obtain likely real values, multiply the densities in the table by the average gamma of the film used.
** Maximum permissible range is 5.1/3 EV – 1 : 40 or density 1.6.
Exposure latitude and contrast:
The nearer the luminance range of the subject approaches the limiting density range on the film, the smaller the exposure latitude. Subjects of such limiting range therefore need particutended brightness range. Failure to base exposures on such spot readings is the most frequent cause of the exposure errors indicated above.
How to avoid exposure errors
- Reduce sources of error 2 and 3
- Eliminate sources of error 4 and 6 = fact. no.1
- Carefully observe the limiting density range of the film (fact no. 2)
How:
- Use contrast spot readings (in the film plane)
- Reduce the lighting contrast. Where this is not possible:
- If the subject brightness range exceeds 1 : 32 make extra exposures on a softer working negative material which can cope with a contrast up to 1 : 150 (in addition to a usual shot on transparency material).
SINAR LTD SCHAFFHAUSEN
CH-8245 Feuerthalen, Switzerland Telephone: (053) 5 45 27
Telex: 76740