

Information No. 8
Sharpness Control in Depth Simple and Precise.
by C.Koch
Professional photographers are familiar with the problems of sharpness control in depth with the tilts of a conventional view camera. You have to know which way to tilt – You must know how far to tilt – And often, the tilt makes additional adjustments necessary. In fact, sharpness control and tilt or swing procedure have changed little since the era of the wooden studio camera – until the SINAR P came along. The fundamentally new design of this camera brought an equally new procedure for sharpness/tilt control. It is based on a simple and precise two-point focusing system. This new focusing system becomes most obvious on comparison with traditional methods. By «traditional» we do not mean a specific camera of make, but the camera designs and the required focusing procedure of the past. With any method, the intended pictorial effect is paramount. Basically, for depth focusing with the camera tilt (the so-called Scheimpflug principle) we can of course tilt either the camera back or the lens standard. If for instance vertical lines are to appear parallel, the image plane must be parallel to those verticals and any sharpness in depth controlled by tilting the lens standard. However, for deliberate perspective emphasis with sharpness in depth – for instance to make a foreground really prominent – the best way is to tilt the camera back, i. e. the image plane. Between these two extremes we have a wide range of practical compromises. The camera design and operation must of course match these requirements
The function of the rear standard
(camera back)
The tilting system
Traditional
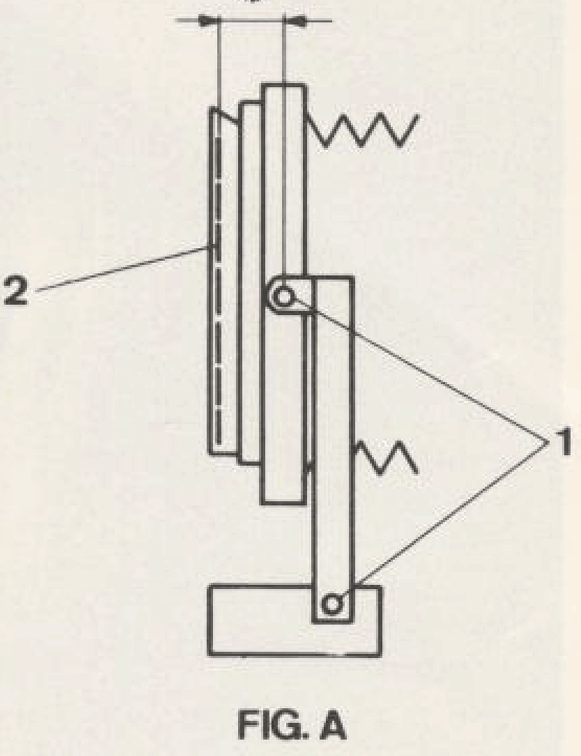
Base and/or centre tilts, as in Fig. A. At the least, the horizontal tilt axis (1) is in front of (or behind) the film plane (2 ).*
The result:
After tilting 2 you have to readjust the camera because every tilt:
- Upsets the image sharpness over the whole ground glass screen area
- Shifts the entire screen image.
*If in doubt. measure the difference. The lens standard usually is displaced in an analogous way.
SINAR P
THE NEW FEATURE:
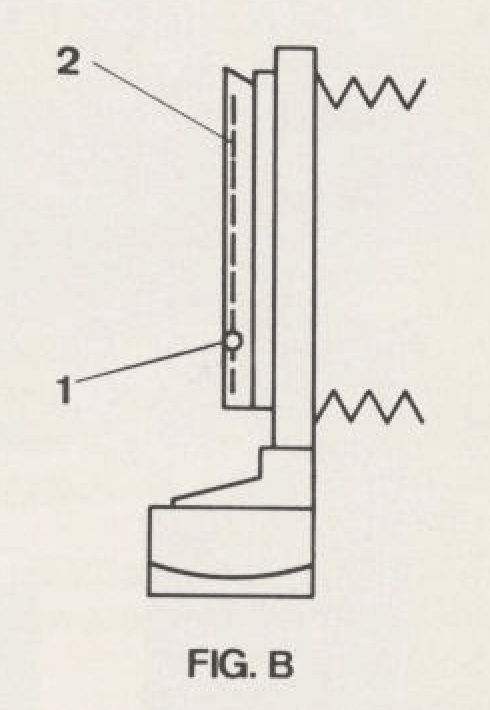
The segment tilt (patented design) as in Fig. B. Both tilting axes, including the horizontal one (1 ), are exactly in the film plane (2).
What it does: Every time you tilt:
- The image sharpness remains unchanged in the tilt axis. – The ground glass
- The ground glass screen image in the tilt axis remains stationary.
The camera result:
Settings You no after longer a tilt have to adjustment.refocus readjust other camera seatings after a tilt adjustment
Operation
Traditional
Every tilt adjustment requires 3 to 5 operations:
Unlocking one (or even two) settings
- Adjusting the tilt (course tilt, without micrometer drive)
- Relocking one (or two) settings
SINAR P
THE NEW FEATURE:
Micrometer drives for all camera movements, including the tilts. A tilt adjustment now requires at the most two operations:
- Switching over from horizontal swing to vertical tilt or vice versa (if necessary)
- Turning a knob
The result:
The settings are precision controlled, simple and rapid and you need only one hand.
Focusing technique
Traditional
You have to stop to work out the right tilt direction -at least about the horizontal axis.
You have to estimate the correct degree of tilt -at least about the horizontal axis -by trial and error.
(And as we saw above, each tilt adjustment needs 3 to 5 operating steps to displace the sharp image plane as well as image position if the tilt axis is not exactly in the image plane.)
SINAR P
THE NEW FEATURE:
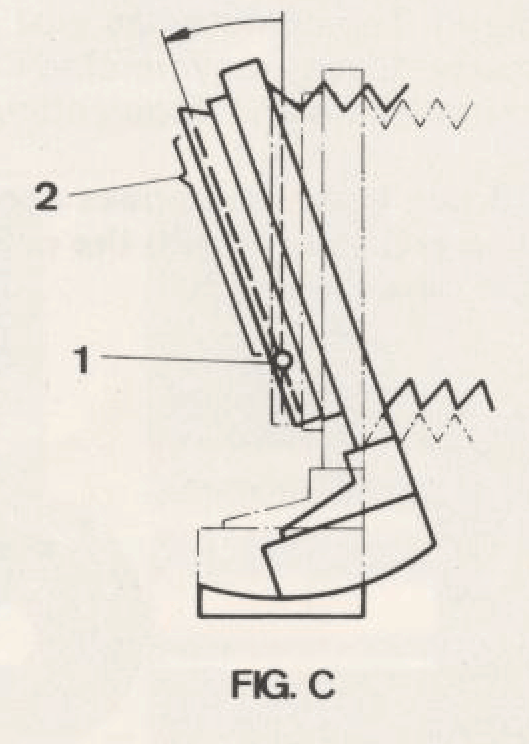
Twopoint focusing with micrometer drives. The way of tilting about the horizontal axis is shown in Fig. C
- With the micrometer drives, focus for maximum sharpness on a point on the tilt axis (1 ).
- Adjust the micrometer tilt to get a point in the image area (2) opposite the tilt axis sharp.
That is all! –
The result:
The sharpness setting automatically takes care of the tilt direction and tilt angle. You just turn two knobs; neither the sharpness nor the image shifts on the tilt axis.
A swing about a vertical axis works in the same way as a tilt about a horizontal axis. Both swing and tilt can be combined, even with indirect parallel displacement, for the vertical swing axis remains stationary.
Arrangement of the swing and tilt axes
Traditional
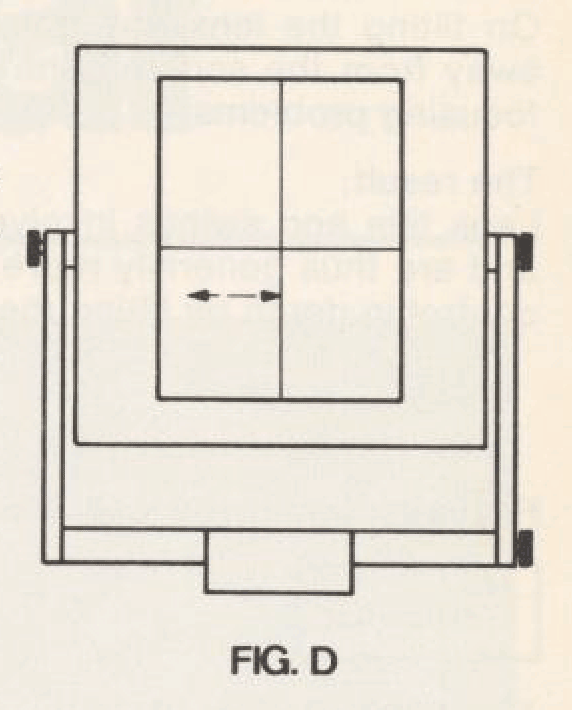
Central (and/or outside the image field, as in Fig. D.
SINAR P
THE NEW FEATURE:
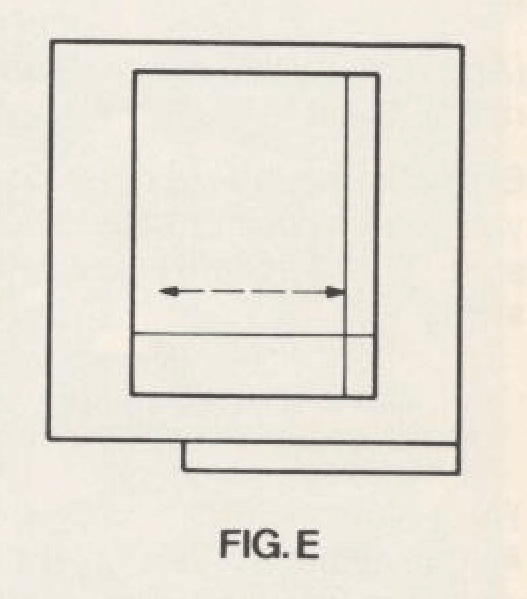
«Asymmetric» axes (patented) as in Fig. E.
This provides an increased base lenght between the tilt axis and the edge of the image field for twopoint focusing.
The result:
You focus more precisely over the whole image.
Measuring the tilt angles
SINAR P
THE NEW FEATURE:
With the simple precision tilt adjustment of the camera back you can equally measure tilt angles for sharpness control with the lens standdard.
Sharpness control in depth with the lens standard
(without perspective change)
Measuring the tilt angles
Focus shift and curvature of field:
Lenses are corrected to yield a sharp image in a flat film plane. Oblique rays to the image corner thus come to a focus farther from the lens centre than central rays. Hence, a lens tilt (or swing) shifts the plane of maximum sharpness over the whole ground glass screen, irrespective of the camera design. This causes focusing problems.*
Image shift:
On tilting the lens, the point focused usually moves away from the screen centre – which causes further focusing problems.*
The result:
Lens tilts and swings involve secondary image shifts and are thus generally more complex than sharpness control in depth by tilting the camera back.
* Try it yourself by swinging or tilting the lens in different directions. Check and compare the image shift relative to the swing and/or tilt axes!
Focusing technique with the lens tilts
Traditional
You have to stop to work out the right tilt direction.
You have to estimate the correct tilt angle by trial and error.
(And remember: every tilt adjustment needs 3 to 5 operating steps.)
Every time you adjust the tilt angle of the lens standard, you have to correct the resulting focus shift and image shift. This applies equally to the usual central tilt or swing.
The result:
As you adjust the lens tilt, the overall sharpness changes while the focusing point at the same time shifts relative to the tilt axis. So the reference points in the image tend to run away and are difficult to keep under control. Hence you have to rely on cumbersome trial and error procedures.
SINAR P
THE NEW FEATURE:
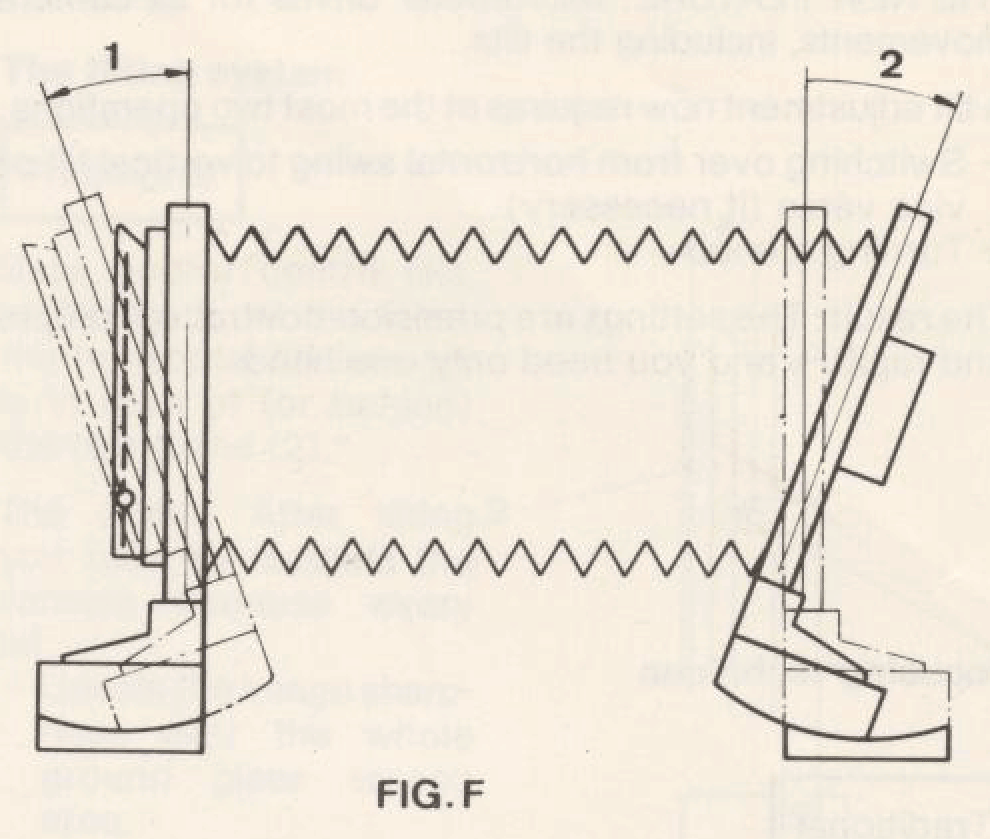
Instead of trial and error, you measure on the SINAR-p the tilt angle of the image plane without any of these complications. In Fig. F the procedure is shown for a tilt about the horizontal axis.
- Tilt the camera back (1 )for optimum overall sharpness. Read off the tilt angle. Return the back to its original position to retain the original image perspective.
- Transfer the tilt angle read off on to the lens standard (2). Tilt this in the same direction as you tilted the camera back to return to its original position.
- After this tilt of the lens standard, refocus the latter to correct the sharpness shift due to the lens tilt. If necessary raise or lower the standard to restore any image shift. (A fine adjustment of the lens tilt angle can be established precisely by a further measurement and correction. But in practice, the final sharpness adjustment is easier by precision tilting of the camera back as described before; such a fine correction will not significantly affect the perspective rendering but quickly ensures complete overall sharpness.)
The result:
The tilt direction and angle are precisely and simply established even with the lens tilt – without altering a given preselected perspective rendering.
A swing about the vertical axis works in the same way as a tilt about the horizontal axis. Swings and tilts can also be combined, even with indirect parallel displacement, for the vertical swing axis remains stationary. For closeups focus as indicated in the instruction manual.
To sum up
The SINAR-p design and two-point focusing system** permit easy tilt measurement for sharpness control in depth. The camera has vital practical features: micrometer drives, «asymmetric» tilt and swing axes in the image plane and large setting scales.
All this make sharpness control in depth simple, precise and easy – with the camera back as well as with the lens standard.
** The location of a plane in space Is determined by 3 points (or by one ax,s plus one point) The SINAR·p 2·point focusing technique is applied tor the swing about one axis (the first setting point is chosen on this axis. the second one off the axis) If requested. sharpness may be set on a third point, too, by subsequent swing about the other axis
Copyright: SINAR LTD SCHAFFHAUSEN CH-8245 Feuerthalen / Switzerland