
Better image setting … leads to better pictures
by Carl Koch

Introduction:
The image setting
The best lens, with the best resolving power and the use of best possible film material depend entirely on the precision of the image setting.
Here the large-format view camera has a not undeserved reputation of being too complex in its settings.
However things are changing even for the view camera. Significant modifications over recent years are aiming at:
- Simpler image settings -and
- Simpler exposure handling
In this part we deal with streamlining the image setting, beginning with the camera movements and focusing.
Our goal: improved picture quality.
Feature No. 1:
Camera shifts with micrometer drive
The improvements manifest themselves already in the camera displacements. With frictionbraked micrometer drives, you have precise one-handed operation. No need for separate clamping.
The effect:
• Simpler adjustment
Feature No. 2:
Swing and tilt axes in the film plane
Locating the horizontal and vertical swing and tilt axes in the film plane eliminates refocusing and image drift during swing and tilt adjustments. (With many cameras these axes are more than 1 cm outside the image plane which necessitates much fiddling.)
The effect:
• Simpler adjustment
• More precise focusing•
Feature No. 3:
Extended adjustment base covering whole picture space
With centre tilting (Fig. 3a) the adjustment base is about half that of asymmetric base tilting (Fig. 3b) and the latter extends over the whole picture space (SINAR Patent DP 1 276 995).
The effect:
• Simpler adjustment
• More precise focusing*
*Better image setting … leads to better pictures
Feature No. 4:
Two-point focusing
Two-point focusing with a base extending over the whole image works like a fan (Fig. 4). The pivot is the asymmetric tilt axis in the film plane: that is where you focus on the 1st image point. Now adjust the tilt until the 2nd selected image point appears sharp somewhere within the range of the fan. That’s all. It couldn’t be simpler.
Note: It doesn’t matter whether the 1st focusing point is a near or distant point. For by focusing on the 2nd image point you necessarily tilt in the right direction.
Two-point focusing works in the same way with horizontal swings and vertical tilts.
The effect:
• Straightforward swing and tilt adjustment
• Straightforward focusing*
Feature No. 4a:
Micrometer drives for depth focusing
As tilting also involves focusing on a further image point, this, like the main focus adjustment, uses micrometer drives. That eliminates separate clamping.
The effect:
• More precise focusing*
• Simpler operation
Feature No. 5:
Focusing off-axis image points
With both central and asymmetric tilt axes there may be cases where the first focusing point is not on the tilt axis. The asymmetric tilt axis provides an easy solution for this problem, too.
- Shift the tilt axis up to the focusing point X by the micrometer drive (see Fig. 5a and b).
- Now use Two-point focusing as described for feature No. 4.
- Again use the shift to move the tilt axis down to the original image framing as in Fig. 5a.
- If the camera is tilted you need a final overall focus adjustment. That is all.
This adjustment needs no double sliding movements. The same job (with off-axis focusing point X) can also be done without shifting the standards or tilt axes by repeating the Two-point focusing sequence X 1-2 (Fig. 5c).
Note: This works in the same way for swings about the vertical axis.
The effect:
• Simple settings*
Feature No. 6:
Same layout of horizontal and vertical tilt and swing axes
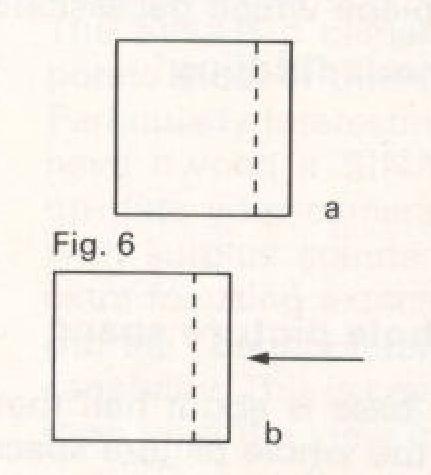
One drawback of many view cameras is the different mechanical layout of the horizontal and vertical tilt and swing axes. While the horizontal tilt axis usually moves with a rise or fall adjustment (see tilt axis in Figs. 5a to b} the vertical axis usually remains stationary during a cross-front movement. This means inconsistent adjustments.
For consistent camera operation, the vertical axis must also move with a lateral shift, see Figs. 6a to b. That way you can here again focus on off-axis image points (see advantage No. 5).
The effect:
• Consistent and hence simpler operation*
*Better image setting … leads to better pictures
Feature No. 7:
Transferring focus drift with lens swings
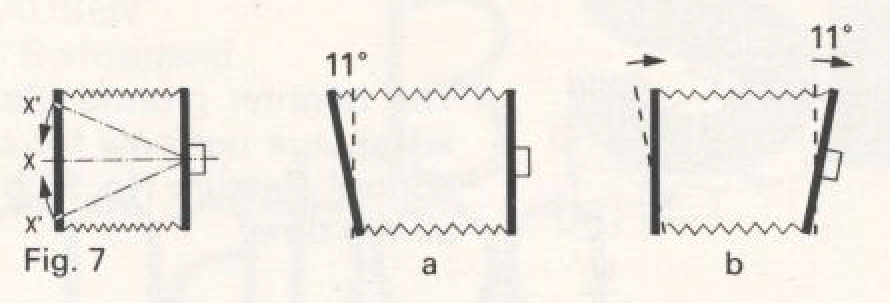
A lens tilt or swing always causes a focus drift as the longer marginal ray path X’ (Fig. 7) swings into the image centre -even if you tilt exactly about the rear lens node.
With unsymmetrical lens systems the image drifts, too. That leads to an unsharp screen image and trial-and error fiddling.
This problem is transferred by angle measurement with the straightforward image standard. Here is how it works:
- Adjust the sharpness distribution with the image standard (for instance 11 • tilt in Fig. 7a).
- Return the image standard to zero and transfer the tilt angle (11 °) in the same direction to the lens standard as in Fig. 7b.
- With close-ups finally correct minor residual tilt errors by adjusting the image standard. This final correction has virtually no effect on perspective.
This simplified operation needs a camera with the swing and tilt axes in the film plane, i.e. with feature No. 2. But features 3 to 8 also play their part.
The effect:
• More precise adjustment*
• No trial-and-error fiddling
Feature No. 8:
No way with inclined camera
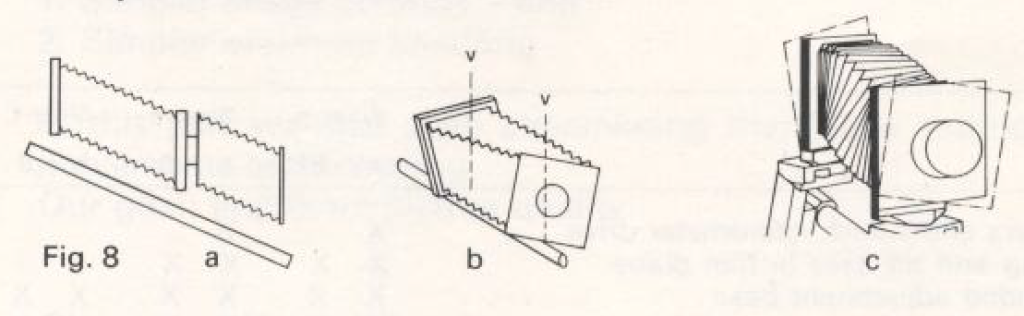
For product shots and with the bellows hood a frequent arrangement involves inclining the camera downwards while the standards are tilted back to vertical (Fig. 8a).
If you now swing the standards about their vertical axis they frequently yaw away from vertical. And if you swing both standards together to adjust sharpness distribution in depth, the image goes completely out of control (Fig. 8b}.
The segment tilt (SINAR Patent DP 1772918) prevents this yawing (Fig. 8c).
The effect:
• More precise focusing•
• No trial-and-error fiddling
Feature No. 9:
No way with Depth of field monitoring at full aperture camera
For product shots and with the bellows hood a frequent arrangement involves inclining the camera downwards while the standards are tilted back to vertical (Fig. 8a).
Where tilt adjustments cannot bring all main image points into one plane of sharpness, you have to stop down to extend depth of field.
With a view camera you generally check this extending sharp zone on an increasingly darker ground glass screen. Not surprisingly, you don’t really know where you are. So you stop down one to two stops extra «for safety» -the best way of wasting focusing precision, film speed and extra unnecessary lighting in the studio (every lens stop smaller means twice the light requirement).
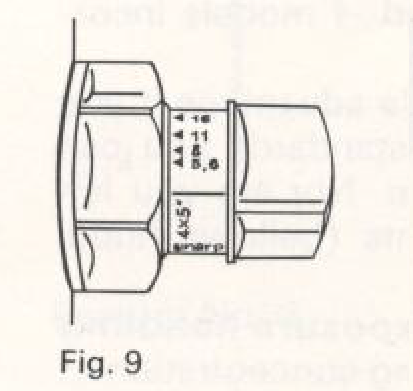
The solution to this very real problem is a built-in depth of field scale used in conjunction with the fine focusing adjustment. With this practical aid you see the exact working aperture you need -at the full lens opening, with any lens. And you get this working aperture without displacement of the lens standard. So you avoid close-up focusing problems.
The effect:
• Precise fine focusing•
• Reliable settings without fiddling
*Better image setting … leads to better pictures
Feature No. 10:
Focusing a brighter screen image
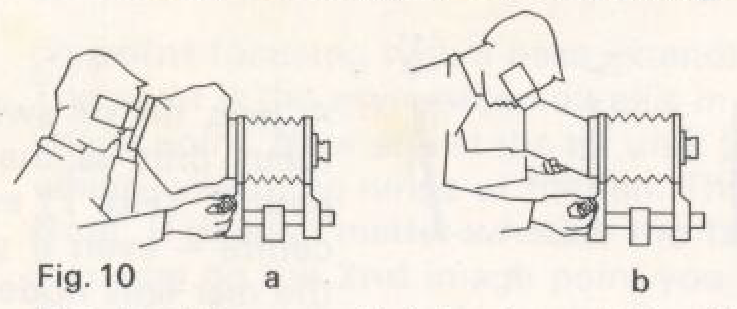
The brighter ground glass screen image is an advantage not only for optimum depth of field control (feature No. 9) but for precise focusing all the time.
The best lens and highest-resolving film completely depend on focusing precision.
That means two-eyed viewing of the large-size ground glass screen image. And the eyes must also take in the diverging light rays.
This becomes possible with a patented SINAR binocular magnifier (DP 2 057 806). It offers binocular viewing, completely shields off all external light and takes in the diverging light rays, too (Fig. 10a); with the patented 4×5″ SINAR binocular reflex magnifier it yields an upright screen image (DP 1 277 000) – Fig. 10b.
A Fresnel lens is an important aid, but cannot replace these binocular magnifiers.
The effect:
• Greater focus precision•
• Faster and more reliable focusing•
*Better image setting … leads to better pictures
To sum up
Obviously features 1 to 10 between them add up to a completely new view camera concept. All along the line this aids in setting the image – and offers simpler operation.
The summary below shows how these features are the key to high-class professional camera performance.
Feature
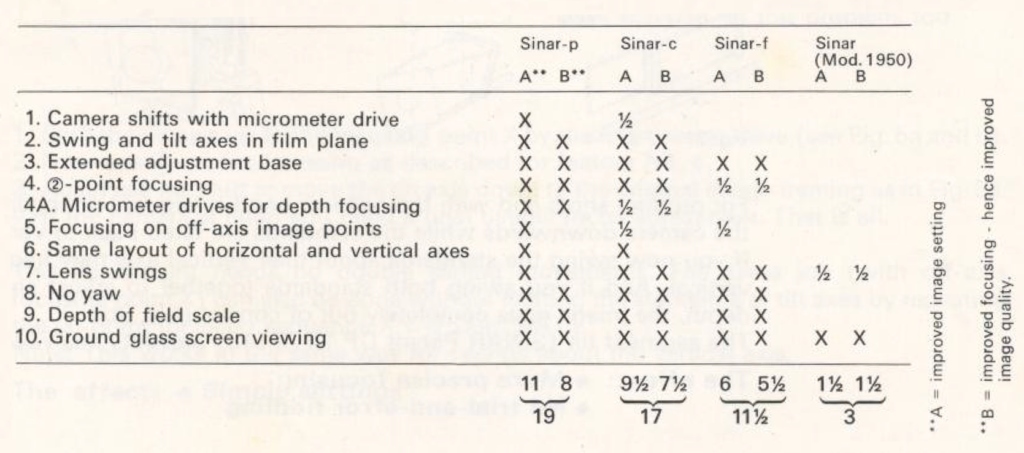
Evidently this impressive range of improvements represents important progress towards better pictures and not just pointless technical gadgetry.
The SINAR-p cameras offer all the features listed; the SINAR-c and -f models incorporate most of them.
Particularly interesting is the progress over the 1950 SINAR. A double advantage if you have owned a SINAR that long is that with the interchangeable standards you can up-date your camera to the latest model without buying a new one. Nor are you left with surplus standards, for they become further system components (bellows hood, extra focusing extension, close-up subject stage, etc.).
But the “better picture” also makes more demands on the camera’s exposure handling capability. This is covered in SINAR Information No.14 “Closer shooting concentration … even with the view camera”.