
Multiple exposures
Photographer Hansruedi Jutzi shows how it’s done


For the ultimate image
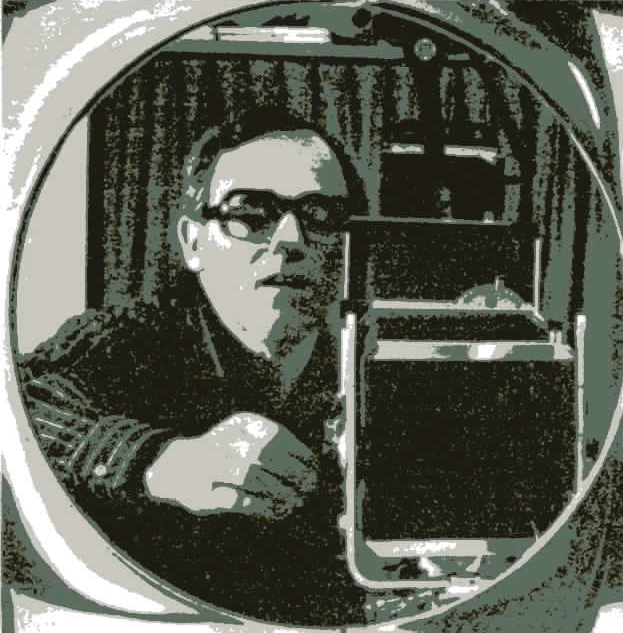
The photographer
Hansruedi Jutzi, 54 years old, comes from a country area of the Zurich Oberland. His original professional training and study of philosophical subjects had nothing to do with photography. Yet he was attracted to this medium and soon became engaged in it professionally. To learn the job, he became assistant to well-known landscape photographer Willi P. Burkhardt.
After this, Hansruedi Jutzi opened a studio of his own in Zurich for largescale advertising and product work and became famous for impressive image photography. As the noise, pollution and lack of parking facilities in town became unbearable, Jutzi moved to the quieter Dietlikon area outside Zurich, built a new house and studio and now runs a one-man operation, exclusively devoted to the photographic realisation of integral business image concepts.
His various commercial clients formulate their requirements in terms of the final message and leave the approach and visualisation to the photographer, usually without even commissioning an agency or an art director.
Not surprisingly, Jutzi thus often employs multiple exposure techniques and has become an almost unparalleled expert in this field.
The front cover of this Information leaflet is typical of Hansruedi Jutzi’s work. Here he describes how it came into being:
The assignment
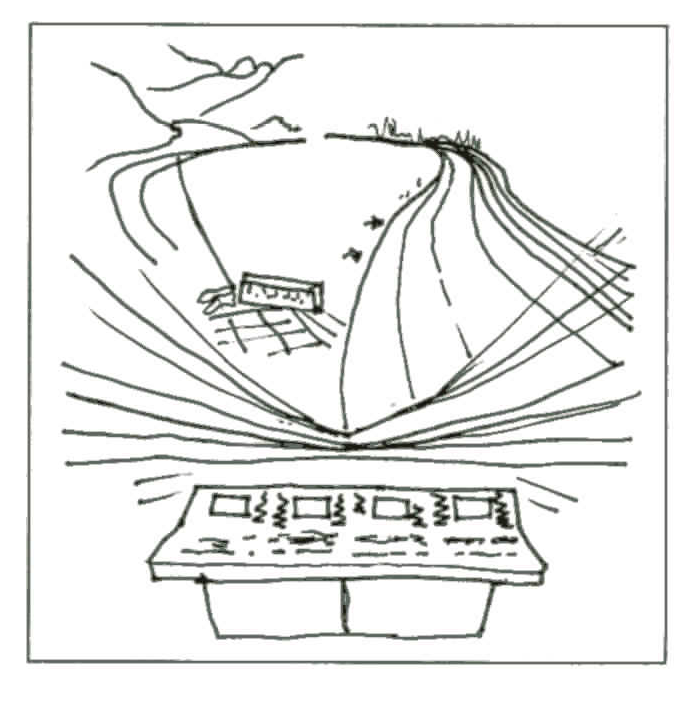
The client wanted a cover for a brochure on traffic control systems. The shot should convey the idea of electronic control in industry.
The picture therefore had to show the main applications of the versatile system and in particular illustrate simultaneous control of widely separate points for instance a barrage with its power station or the entire rail network of the French National Railways.
The control plant to be publicised can equally control traffic over a whole entire motorway system or Mecca’s largest mosque which has to cope with more than 40 million pilgrims a year.
The problem
I first had to decide on the selection of the various applications to be included in the picture.
In view of current problems of energy generation and overall traffic control, an obvious combination appeared to be the main control panel with images of the hydraulic power station with its barrage, of a motorway to convey individual traffic and the railroad.
The control panel was to serve as the visual centre of the electronic control idea, supporting and linking the other image elements.
As the picture was primarily aimed at the factual outlook of an engineer it needed a clear and logical layout, decorative yet factually and technically accurate.
Practical preparations
What took most time was preparing new high-quality colour transparencies of a railway line and a motorway. These shots had to match already available transparencies of the barrage and power station to make a harmonic combination.
Finally I had five colour transparencies with which I thought I could visually convey the theme:
- The frontal shot of the control panel outlined in black
- A long-time exposure of the motorway
- The barrage with its curved dam
- The power station and high-pressure pipeline
- A stylised night shot of a railway line.
The shots were selected not only for their inherent pictorial appeal; I had to visualize constantly also their eventual combination.
For instance, at a suitable scale of reproduction the curved line of the dam could obviously continue the motorway bend. That in turn established a correct functional and pictorial location for the bottom power station.
Finally, I had to incorporate the rail disappearing into the distance without distracting from the effect of the central control panel. The solution was to double up the gentle backward curve of the railway shot with its own mirror image.
Rough outline sketches can greatly simplify the job of visualising the effect while viewing the initial transparencies on a light box. These rough sketches got more and more detailed as the planning proceeded and became vital for the final combination exposures of the individual image components.
With more complex jobs the layout sketch can serve as a basis for a cutand-paste montage of the transparencies enlarged to correct scale on directpositive paper.
It is useful if you can make the required enlargement in your own darkroom – and easy with the simple handling of modern direct-positive colour materials.
For this purpose the final layout sketch is placed on the enlarger baseboard as a guide for producing a colour print of the right magnification -without complicated figuring – from each original transparency.
Cut out and pasted together, these paper prints then provide a first general impression of the combination.
This somewhat laborious intermediate stage is always worthwhile when you want to assess the effect before the final assembly – or if you have to present a first layout to the client.
In this case, I could see already from the rough sketch that I only had to enlarge the railway shot – once right-reading and once laterally reversed – and combine the two images for a symmetrical support to the rest of the combination.
So I ordered a high-quality internegative from the original transparency and two paper enlargements -right-reading and laterally reversed. I cut and pasted the two images together; as the railroad disappears into blackness at the rear, there was no need even for retouching at the past-up edges.

Technical requirements
There are various ways of combining individual image components. Darkroom and graphic arts techniques are particularly popular.
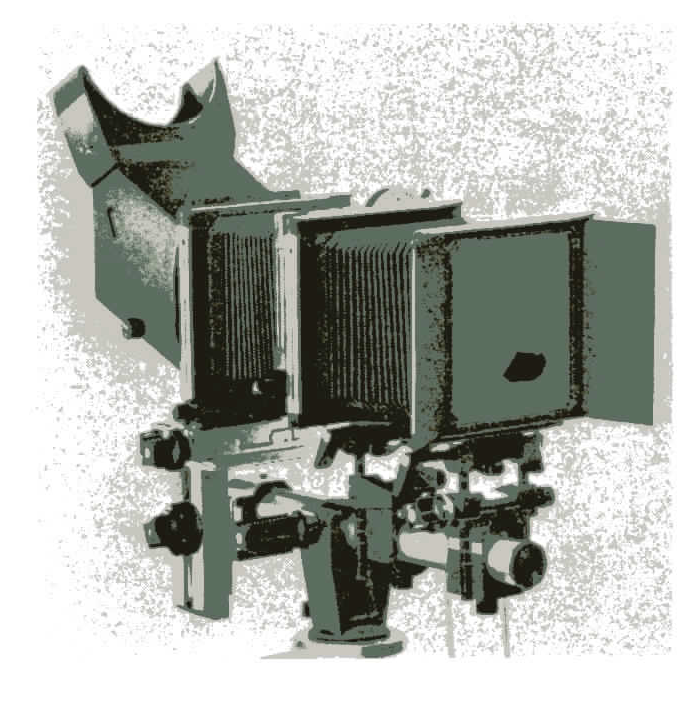
My own feeling is that few of the usual procedures allow image combination with sufficiently smooth blending. For this reason I expose the individual image components directly on sheet film in a view camera, using mattes or masks mounted immediately in front of the camera lens.
Exact operation here requires a camera with high-precision movements, in particular parallel displacement and swings and tilts adjustable to within less than a millimetre.
My SINAR meets this condition with the accuracy of the micrometer drive on the SINAR-p rear standard. To hold the mattes I use the accessory bellows hood mask which permits exact adjustment of the required masks and countermasks. Decreasing or increasing the bellows hood extension provides sharper or less sharp boundaries as required.
To support the bellows hood mask I used the auxiliary standard II with its own micrometer drive.
The binocular reflex magnifier fitted behind the focusing screen not only yields an upright ground glass screen image but also helps assessment of the tricky combination adjustments on the enlarged screen image. A large and bright screen image is essential to permit exact matching of drawn-in outlines of exposed sections with new image elements.
With multi-exposure assembly the exposure must be correct for each individual image component. This is a complex problem which can only be solved by spot readings of small and precisely defined areas directly in the image plane. Only the SINARSIX can do this with the required accuracy.
Most of the image components come from positive colour transparencies which I copy on a light box. Usually, however, I have to colour-match the original transparencies. The source of the light box must therefore have a continuous spectrum and a colour temperature adjustable within reasonable limits.
For this purpose I built a light box containing a 3400 K tungsten-halogen lamp. A dimmer wired in series then adjusts the colour temperature continuously between about 2500 and 3400 K. That way I can in most cases match the colour balance of different original transparencies without the use of CC filters.
The lens used is an apochromat type of high colour correction, specially computed for the required reproduction scales.
The procedure
The camera film is a commercial colour reversal material balanced for 3100 K tungsten lighting and of good widerange reciprocity characteristics.
For this job I first exposed the combined C print of the railway line, using a normal copying lighting setup.
The camera was adjusted according to the layout sketch. To avoid flare I darkened the studio both for the exposure measurement and for the copying exposure. Multi-point spot readings with the SINARSIX meter provided the exposure measurement.
After the exposure I used a felt pen to draw in the outline of the railway directly on the ground glass screen.
After this first exposure I photographed the motorway transparency. This was placed on the light box, secured and the colour temperature correctly adjusted from experience. Any remaining illuminated area of the light box must be fully covered up with black paper.
I adjusted the camera once more with the aid of the layout sketch and the ground glass screen outline of the image portion already exposed. Immediately after fine focusing I had to mask off the already exposed image area and the sections for the exposures still to be made. This is where the SINAR bellows hood mask was useful as it can take precise cutout masks in matt black card.
I carefully adjusted the mask while viewing on the screen with the lens at working aperture. The sharpness and location of the boundary can be controlled as required by adjusting the bellows extension and moving the bellows frame. After the exposure this image outline was again drawn in carefully on the ground glass screen.
In the same way I exposed the barrage, the power station and finally the control panel.
Each time the masks in the bellows hood were adjusted to clear only the area for the image section being taken. Basically the same multi-exposure procedure can of course be used directly with real objects. A useful precaution is to make each exposure on several films.
That way you avoid having to repeat an entire series if you are distracted and make a mistake.
To avoid all errors I use the SINAR autoaperture shutter. That way I never forget to stop down the lens. Equally I can check the selected shutter speed at any time without moving from behind the camera.
interview: Christiane Marchesi, Zurich
For the ultimate image
The following components of the SINAR system have been used for this picture:
SINAR p Standard
No. 491 .26
SINARSIX
No. 524.21
Binocular Reflex Magnifier Multipurpose Standard II
No. 531.12
with focus
No. 433.31
Auto-aperture shutter
No. 521.31
Bellows hood mask
No. 533.11
Further details on these items are given in our literature.
SINAR LTD SCHAFFHAUSEN
CH-8245 Feuerthalen/Switzerland
Telephone – 053 54527 / 48921
Telex 76740
Cable address
SINAR CH-8245 Feuerthalen