Facing up to the future
SINAR’s new exposure meter generation
by Christiane Marchesi
More than 10 years ago Swiss camera maker SINAR introduced true spot exposure metering in the view camera’s film plane with the SINARSIX system. At that time photo studios still largely used tungsten sources, and the new metering method with its precise contrast control capability was a revolutionary innovation.
The SINARSIX remained equally useful when studios began to switch to successive generations of electronic flash systems, tor the modelling light of the flash still permitted effective contrast control. But for exposure measurement itself, photographers had to go back to the first generation of flash exposure meters suitable only for incident light readings, with neither reflected-light nor spot measurement.
1980 again made photographic history. For the first time a group of manufacturers is producing spot exposure meters with full flash compatibility. The author has worked with the first SINAR exposure meters of this new generation and in this article describes this approach of “tailored automation”.
Spot exposure metering in the view camera
What most impressed me when I started photography were the grand old men with their 8 x 10 inch cameras who had never touched an exposure meter. Allegedly they could estimate the correct exposure with almost dead certainty and in virtually any set-up.
The could, indeed. But they were invariably working with standardised set-ups – In very similar conditions from shot to shot. By now, I can do that, too, in my own special field. For straightforward catalog shots in the studio, all uniformly lit with a broad studio flash flood and just a little modelling light sparingly added – there I also know which stop I need. Nor does it vary significantly in these constant set ups.
To be on the safe side one can make three exposures of every shot at 1/3 stop intervals. And if then an exposure is still not quite right and you want to salve your conscience, you can blame the processing laboratory. No problem.
Fortunately life is not as dull as that: everyday professional photography includes more demanding jobs, too, with considerably trickier conditions. Here, too, there is only one correct exposure. And it is up to the professional to get the exposure right every time. Exposure tests waste valuable time; waiting for processing of the tests ties up expensive studio space and increases material consumption.
The grand old past masters would today also need more reliable metering gear. They, too, would be under pressure to deliver results fast and could afford no errors or shortcomings. Where speed counts, the approach must be absolutely professional; leisurely trialand-error operators soon lose their reputation and their customers. Not only correct exposure measurement matters; even more important is full control of brightness ranges. The professional unfortunately can rarely afford to take pictures for his own pleasure. The transparencies he produces are originals for reproduction to meet very specific requirements, usually as printed reflection images. To ensure reliable photomechanical reproduction of the stipulated high quality, the transparency supplied to the customer must not exceed a certain contrast.
By carefully controlled lighting it is possible to adjust the required subject brightness range at the time of the exposure. For that it is necessary to measure the luminance of every subject point. And this is where spot exposure readings come in.
With the SINARSIX you can measure nearly every image point in this way. The movable measuring probe reads the brightness exactly where the film is also exposed, namely in the image plane. (Measurement on the ground glass &creen is subject to too many uncertainties.)
The photographer can thus achieve true spot readings without moving from behind the camera.
The reading also automatically takes care of all other factors affecting the exposure, for instance correction filters, increased bellows extension, aperture tolerances and light fall-off at the image edge. The last factor in particular can be quite serious even with straightforward exposures.
Spot readings in the film plane permit closely controlled lighting adjustments: The photographer monitors the meter readings while his assistant adjusts the lighting until each given point in the image plane yields a required luminance value.


For the ultimate image
From the SINARSIX to the PROFl-select TTL
The SINARSIX used a CdS cell for its measurements and was only suitable for continuous light readings. To establish contrast with flash lighting it was necessary to measure the proportional modelling lights of the studio flash system. That is easy with suitable flash units. But with many studio flashes the proportional relationship of modelling lamp to flash output is not as accurate as it should be. Professionals therefore soon started to look for an exposure meter of SINAASIX facilities but capable of flash as well as continuous-light readings.
In collaboration with exposure meter manufacturer Gossen, SINAR managed to realise this idea at a reasonable price. Gossen not long ago brought out a new PROFISIX manual exposure meter. For this useful unit there is a whole range of accessory attachments which greatly helped to make this exposure meter popular.
One of the attachments is the PAOFl-flash which converts the continuous-light PROFISIX into a conventional flash meter for integral flash intensity measurement by incident light readings (pointing the meter from the subject towards the camera).

PROFISIX and PROFl-select TTL
The logical next step was to design an attachment for the PROFISIX to permit true spot readings in the film plane of view cameras, based on the SINARSIX principle.
This probe attachment is called the
PAOFl-select TTL and consists primarily of a meter probe for film plane metering, connected to an adapter unit by a coiled cord. The adapter unit in turn fits the basic PROFISIX like any other attachment. (Fig. 1)
A lightmeter cassette to fit international 4 x 5 inch and 13 x 18 cm (5 x 7 inch) camera backs allows the PROFl-select TTL to be used with any view camera. A lightmeter cassette adapter extends the 13 x 18 cm lightmeter cassette to the 8 x 10 inch size for use in the largest view cameras.
With these features the metering probe can reach and measure virtually any point of the film plane. For continuous-light metering the unit is handled in much the same way as the PROFlSIX on its own. You select continuous-light mode by a switch on the adapter unit and switch on the whole system with the
PROFISIX switch. As with the basic meter on its own, the meter needle gives a reading, depending on the light intensity, once you operate the meter probe switch. The needle position is then centred on a zero point by turning the setting dial. Finally, you can read off the exposure time required at the set lens aperture opposite the f/1 aperture mark. Normally, working-aperture readings are preferable to allow for unpredictable aperture factors (mechanical tolerances, compensated artificial vignetting etc.). Brightness range metering is equally easy: just note the exposure values indicated at two selected metering points. The exposure value difference then is the subject brightness range in lens stops. By selecting a mean between the two you automatically obtain the correct exposure time.
The same instrument however also permits flash spot readings. In that case merely set the selector switch to “flash” and trigger the flash after operating the probe switch. This can be done by normally releasing the shutter with which the flash is synchronised. The meter needle swings out and is again realigned to zero with the PROFISIX dial.
The light value scale then shows whether the flash output was correct for the preset aperture, or whether it is too high or too low. If the light value scale shows 0, the flash output was exactly right. With a -1 reading you would need two flashes or open the working aperture by one stop. With a -4 light value you would need four flashes or open the aperture by two stops. If the indication is +1, the light is too strong and you have to halve the flash power or close the working aperture by one stop – and so on. The reading is accurate within 1/3 light value.
The meter can also accumulate several successive flashes. The meter memory is cleared by pressing a button before a next reading. The reading also allows for a prevailing continuous lighting level equivalent to an exposure time of 1/8 second.

Coping with mixed-light set-ups
The PROFl-select TTL also permits precise mixed-light readings, for instance a set-up where the inside of a room is lit by flash but the shot has to include the view out of the window. For such a subject first take a normal flash reading of the interior and adjust the flash output or working aperture accordingly. Then move the meter probe to a point of the outside view, take a continuous-light reading and read off the exposure time now required opposite the f/1 mark.
The entire unit is powered by the 9 volt battery in the basic meter. The meter cell in the probe is a highly sensitive and colour corrected silicon diode.
I found the PROFl-select TTL system really ingenious. A photographer needs a modern manual exposure meter such as the Gossen PROFISIX, anyway. And at comparatively modest extra cost the view camera photographer can convert this unit to the full PROFlselect TTL spot meter, coping not only with continuous light but with any kind of illumination you are ever likely to need.


For the ultimate image

Coping with mixed-ligThe SINAR metering back
The PROFl-select TTL with the lightmeter cassette – derived from the SINARSIX system – adapts this unit to all view cameras with international back.
This adaptation however has one occasional problem: If you insert the lightmeter cassette in the back, this raises the ground glass screen and the previously focused image becomes slightly unsharp while you select the measuring point and take the reading itself. As the meter cell is smaller still than that of the SINARSIX system, this may sometimes make precise measuring point location difficult.
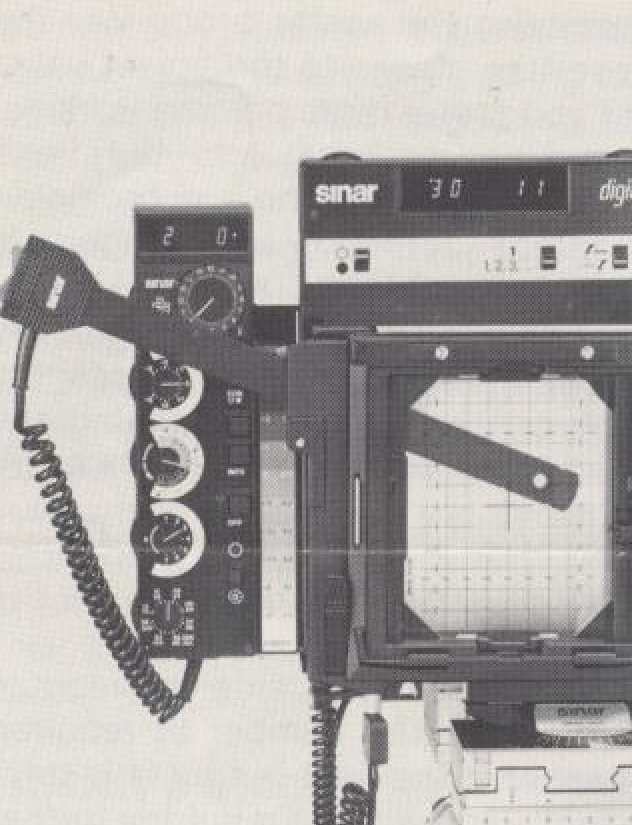
For its own cameras SINAR has an elegant solution to this problem: The new 4 x 5 inch metering back. This has a built-in probe housing along the left-hand side to take the meter probe directly. The PROFlselect TTL is attached to a holder and can then remain constantly on the camera with the metering probe in its rest position (Fig. 2).
For a reading, lift up the metering probe and then push it to any required metering point. As with the lightmeter cassette, the probe can of course be locked at the required measuring spot.

The one obvious advantage of this metering back is that the ground glass screen plane no longer moves. Once the image is focused, it remains sharp and so permits very precise location of any required reading point.
But the back has a few further innovations. As before, you can raise the ground glass screen frame with two fingers for inserting the film holder. But you can also open the frame by a lever to insert the film holder without vibration.
From the middle of this year the metering back is part of the standard SINAR-p outfit. You can of course also get it separately and convert previous camera models.
Coping with mixed-ligThe SINAR metering back
Much has happened in view camera design over the past 40 years. The most important advance was in the 1940s when Carl Koch introduced his SINAR. That made photographic history; the modular concept became the key to the whole view camera evolution for the rest of this century. Apart from providing a flexible modular camera system, SINAR also managed to achieve best possible large-format image control by its ideal swing and tilt system and the depth of field scale. Further features of more reliable operation are standardised auto-aperture housings for all view camera lenses, precisely controlled from a central diaphragm shutter, the behind-lens shutter system, especially the quartzcontrolled Digital shutter. The special point of this is uniform exposure everywhere – from the edge to the centre – of the precise set value. Finally, successful exposures defor setting these exposures automatically.

The Module 1
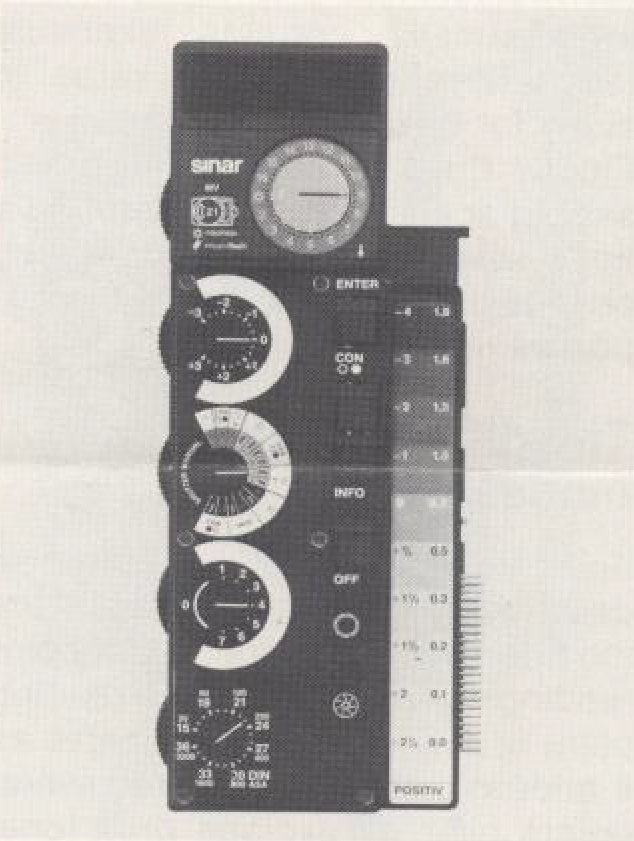
The next component of the electronically controlled view camera is the Module 1 (Fig. 4). This handy box plugs into the terminal socket at the shutter side and locks against the front camera standard frame. The module serves for entering meter readings. At the first stage this can be done manually by setting on the module the metering value indicated by any exposure meter and entering this value by the ENTER key.
The rest proceeds automatically. For instance in the continuous-light mode you select the working aperture on the shutter; the module instantly sets the matching exposure time. Every aperture change adjusts the shutter speed to suit – not only in the shutter display but also on the unit itself.
The module has a correction scale to allow bracketing exposures in 1/3 stop steps.
A setting dial also allows for reciprocity failure and can be set for seven different factors (Schwarzschild). The module then automatically corrects exposure times beyond a certain value to allow for this reciprocity factor. Finally there is also a film speed setting scale. Even after entering a light value, a film speed setting change instantly corrects the exposure time.
The different metering modes
Apart from single-point readings as described for a midtone, the module also covers multi-point readings. For if no suitable reading point is available that can serve as a midtone, simply measure several points near an average grey tone. After every reading input the module calculates a mean value of the previously entered readings, converts this into correct exposure and automatically sets and displays that on the shutter. Obviously the module can also handle two-point readings of a brightest highlight and darkest shadow. Again it automatically calculates a correct mean value and if required shows the resulting brightness range in lens stop intervals.
The flash mode
In this mode the shutter display shows the preselected aperture and exposure time. After the flash reading the display of the module itself shows by how much the light was insufficient or the number of the required flashes and any fractional aperture correction required. If on the other hand the flash was too intense, the process computer indicates the resulting over-exposure in lens stops.
Wrong exposures are impossible. The shutter remains locked until the deviation is reduced to zero and the module frees the exposure for a flash.
Naturally in the flash mode, too, the module calculates mean values from two-point or multi-point readings and when required – on pressing a button – shows the prevailing brightness range. A multiple-flash setting is available in any metering mode. A single reading sequence immediately shows on the module display how many flash exposures are needed with the given aperture. The shutter can then only be released the calculated number of times after which it locks until the next picture.
Direct reading input
This may sound fine, but what about exposure metering itself? True: To utilise the full scope of the SINAR module you have to get away from external exposure metering and manual value input into the module. In particular, you have to cut out disconnected operations with a variety of separate instruments around the camera.
To permit direct location and transfer of meter readings, SINAR designed the SINARSIX DIGITAL. This most advanced stage of the modular system is a meter probe – similar to that of the PROFl-select TTL – linked to the module via a control unit. The probe fits the metering back as well as the lightmeter cassette of the PROFlselect TTL and permits the most straightforward yet precise spot metering in all measuring modes, for instant reliable results with every tape of light. In the continuous-light mode, ope
ration of the meter key of the SINARSIX DIGITAL automatically enters the reading in the module. There the process computer processes the value obtained and sets it as described with manual entry. As you press the meter key, the shutter display also shows the measured value.
Operation becomes particularly interesting in the flash mode. On pressing the meter probe key the aperture closes to the preset value (if you prefer more precise workingaperture readings) and the flash unit plugged into the synchronising contact automatically triggers a flash. The SINARSIX DIGITAL then not only takes a spot reading of the flash intensity but also measures the continuous light reaching the film plane while the shutter is open. The module processes these values and shows the required flash intensity or aperture correction in the display.
In multiple-flash mode the module calculates the number of required flashes if the light output is insufficient – and without requiring further flashes to be triggered for the reading.
Needless to say, all the module facilities described already are equally available with the SINARSIX DIGITAL.
The power supplies
The entire instrument set-up is powered either by the accumulator of the DIGITAL shutter or by a separate accumulator unit that plugs directly into the module.
A quick-charging unit recharges discharged accumulators within four hours. In studio operation the best way is to keep the accumulator connected permanently to the charger to the sure of having a fully charged accumulator when going on location.
A data bus
With very long camera extensions it may be inconvenient to keep the module plugged into the shutter. In that case you can control it from the ground glass screen. A connecting lead then feeds the data from the module to the shutter.


For the ultimate image



The Module 2
You will have noticed that we were referring to a Module 1, implying that there is a further version in the offing.
Indeed, there is. The Module 2 of course does everything the simpler version 1 can do. In addition it also copes with most complex mixedlight situations. Such advanced exposure calculation used to involve numerous uncertainty factors. To deal with these, the Module 2 has an extended mixed-light mode – though this is operative only in conjunction with the SINARSIX DIGITAL.
With flash readings Module 1 already allows for prevailing continuous light at the exposure time preset on the shutter. In actual mixed-light situations the continuous light used for the exposure may however be stronger than the flash used for filling in.
In the mixed-light mode, unlike normal continuous-light or flash readings, the meter probe of the SINARSIX DIGITAL automatically makes two measurements: A flash reading and a continuous-light reading. The module processes both readings – for which the shutter display immediately indicates the corresponding value during the reading – and displays and sets on the shutter the required exposure time to match the preset aperture allowing for both components of the illumination.
With single-point readings the complex computation program starts immediately after taking the first reading, with two-point readings immediately after recording the second metered value. The program then establishes the correct exposure time to the nearest 113 step between 1160 and 80 seconds.
In assessing mixed-light set-ups, an important aid is also the contrast range indication with two-point readings.
In mixed-li_ght set-ups a further “INFO” mode provides check readings of any image point (Fig. 6). At this setting the display shows deviations from the mean brightness in lens stops, without however integrating these readings into the computed measurement. That way you can precisely assess before the exposure the effect of special effects lights, catch lights or dark shadows. Further, the program can calculate various alternative correct exposures. Thus if you modify the aperture, the module calculates the required exposure time for the flash/continuous light combination as a function of the constant flash intensity. With every variation you can also recall the brightness range. You will notice an interesting point here: These alternative exposure combinations yield different lighting ratios without any change in the lighting itself.
In every case however the module shows the correct exposure. In the example shown (Fig. 7a, b, c) the continuous-light intensity (the candle flame) was always constant. However I changed the output of the studio flash for each exposure. As you can see, the exposure remains correct in every case; only the mood of the picture changes. The check readings told me already before the exposure precisely how the resulting picture would look.





For the ultimate image

An overall impression

Till now I did of course manage without SINAR‘s electronic modular system and got the exposure more or less right most of the time (Fig. 8).
But the Module 2 with the SINARSIX DIGITAL made my job much easier. After a short running-in time – which is of course essential to master all details of the system – I could truly devote more attention to creative pictorial control. I stopped making bracketing exposures and suddenly no longer had to get annoyed over effective speed variations in colour film processing.
I was only sorry that I couldn’t keep the equipment on the spot. But they were preproduction prototypes which are not yet on sale.
So I console myself with the simpler but still reliable PROFI-select TTL and look forward for a few months more to SINAR’s fully electronic modules.


SINAR LTD SCHAFFHAUSEN
CH-8245 Feuerthalen, Switzerland Telephone: (053) 5 45 27
Telex: ch 76740
Cables: SINAr CH-8245 Feuerthalen


